%22%2F%3E%0A%20%3Cg%20opacity%3D%220.12%22%3E%0A%20%3Crect%20x%3D%22120%22%20y%3D%22126%22%20width%3D%22420%22%20height%3D%2212%22%20fill%3D%22url(%23g)%22%2F%3E%0A%20%3Crect%20x%3D%22660%22%20y%3D%22472.5%22%20width%3D%22360%22%20height%3D%2212%22%20fill%3D%22url(%23g)%22%2F%3E%0A%20%3C%2Fg%3E%0A%20%3Cg%3E%3Cpath%20d%3D%22M%20907%20414%20L%20300%20187%22%20stroke%3D%22url(%23g)%22%20stroke-opacity%3D%220.25%22%20stroke-width%3D%223%22%2F%3E%3Cpath%20d%3D%22M%20300%20187%20L%20903%20202%22%20stroke%3D%22url(%23g)%22%20stroke-opacity%3D%220.25%22%20stroke-width%3D%223%22%2F%3E%3Cpath%20d%3D%22M%20903%20202%20L%20574%20491%22%20stroke%3D%22url(%23g)%22%20stroke-opacity%3D%220.25%22%20stroke-width%3D%223%22%2F%3E%3Cpath%20d%3D%22M%20574%20491%20L%201031%20268%22%20stroke%3D%22url(%23g)%22%20stroke-opacity%3D%220.25%22%20stroke-width%3D%223%22%2F%3E%3Cpath%20d%3D%22M%201031%20268%20L%20663%20435%22%20stroke%3D%22url(%23g)%22%20stroke-opacity%3D%220.25%22%20stroke-width%3D%223%22%2F%3E%3Ccircle%20cx%3D%22907%22%20cy%3D%22414%22%20r%3D%227%22%20fill%3D%22url(%23g)%22%20opacity%3D%220.6%22%2F%3E%3Ccircle%20cx%3D%22300%22%20cy%3D%22187%22%20r%3D%228%22%20fill%3D%22url(%23g)%22%20opacity%3D%220.6%22%2F%3E%3Ccircle%20cx%3D%22903%22%20cy%3D%22202%22%20r%3D%227%22%20fill%3D%22url(%23g)%22%20opacity%3D%220.6%22%2F%3E%3Ccircle%20cx%3D%22574%22%20cy%3D%22491%22%20r%3D%2212%22%20fill%3D%22url(%23g)%22%20opacity%3D%220.6%22%2F%3E%3Ccircle%20cx%3D%221031%22%20cy%3D%22268%22%20r%3D%2214%22%20fill%3D%22url(%23g)%22%20opacity%3D%220.6%22%2F%3E%3Ccircle%20cx%3D%22663%22%20cy%3D%22435%22%20r%3D%228%22%20fill%3D%22url(%23g)%22%20opacity%3D%220.6%22%2F%3E%3C%2Fg%3E%0A%20%3Cg%3E%0A%20%3Ctext%20x%3D%2250%25%22%20y%3D%2250%25%22%20dominant-baseline%3D%22central%22%20text-anchor%3D%22middle%22%20font-family%3D%22Inter%2Csystem-ui%2CArial%22%20font-size%3D%2290%22%20font-weight%3D%221000%22%20fill%3D%22none%22%20stroke%3D%22%230b1020%22%20stroke-width%3D%2210%22%20stroke-opacity%3D%220.6%22%20style%3D%22paint-order%3A%20stroke%20fill%3B%22%3E%23N8N%20YOUTUBE%20TO..%3C%2Ftext%3E%0A%20%3Ctext%20x%3D%2250%25%22%20y%3D%2250%25%22%20dominant-baseline%3D%22central%22%20text-anchor%3D%22middle%22%20font-family%3D%22Inter%2Csystem-ui%2CArial%22%20font-size%3D%2290%22%20font-weight%3D%221000%22%20fill%3D%22url(%23g)%22%20filter%3D%22url(%23drop)%22%3E%23N8N%20YOUTUBE%20TO..%3C%2Ftext%3E%0A%20%3C%2Fg%3E%0A%20%3Cg%20transform%3D%22rotate(-8%20264%20126)%22%3E%3Ctext%20x%3D%22216%22%20y%3D%22126%22%20font-family%3D%22Inter%2Csystem-ui%2CArial%22%20font-size%3D%2234%22%20font-weight%3D%22700%22%20fill%3D%22url(%23g)%22%20fill-opacity%3D%220.9%22%3EAI%20blog%20post%20generator%3C%2Ftext%3E%3C%2Fg%3E%0A%20%3Cg%20transform%3D%22rotate(10%20936%20516.6)%22%3E%3Ctext%20x%3D%22864%22%20y%3D%22516.6%22%20font-family%3D%22Inter%2Csystem-ui%2CArial%22%20font-size%3D%2234%22%20font-weight%3D%22700%22%20fill%3D%22url(%23g)%22%20fill-opacity%3D%220.9%22%3EYouTube%20transcript%20to%20Markdown%3C%2Ftext%3E%3C%2Fg%3E%0A%20%3Crect%20width%3D%221200%22%20height%3D%22630%22%20fill%3D%22%23000%22%20opacity%3D%220%22%20filter%3D%22url(%23grain)%22%2F%3E%0A%3C%2Fsvg%3E)
{/* Last updated: 2026-04-24 | Built, imported, and executed live on nerdleveltech.app.n8n.cloud | gpt-5-mini via n8n free credits */}
Every node in this guide was wired live on n8n cloud. The workflow JSON you'll download is the exact one we imported, saved, and ran. No placeholder nodes, no
TODOstubs — paste your OpenAI credential and it works.
What You'll Build
- Accepts a YouTube URL + transcript + style via a shareable web form (no code, no deployment)
- Looks up the real video title and channel name via YouTube's public oEmbed endpoint
- Builds a structured context object combining user input and oEmbed metadata
- Passes everything to a LangChain LLM Chain powered by
gpt-5-mini - Returns a publish-ready Markdown blog post — with H1, a 160-char TL;DR, 3–5 H2 sections, a code-friendly structure, and a takeaways list
Here is the complete workflow after import — five nodes plus one AI sub-node:
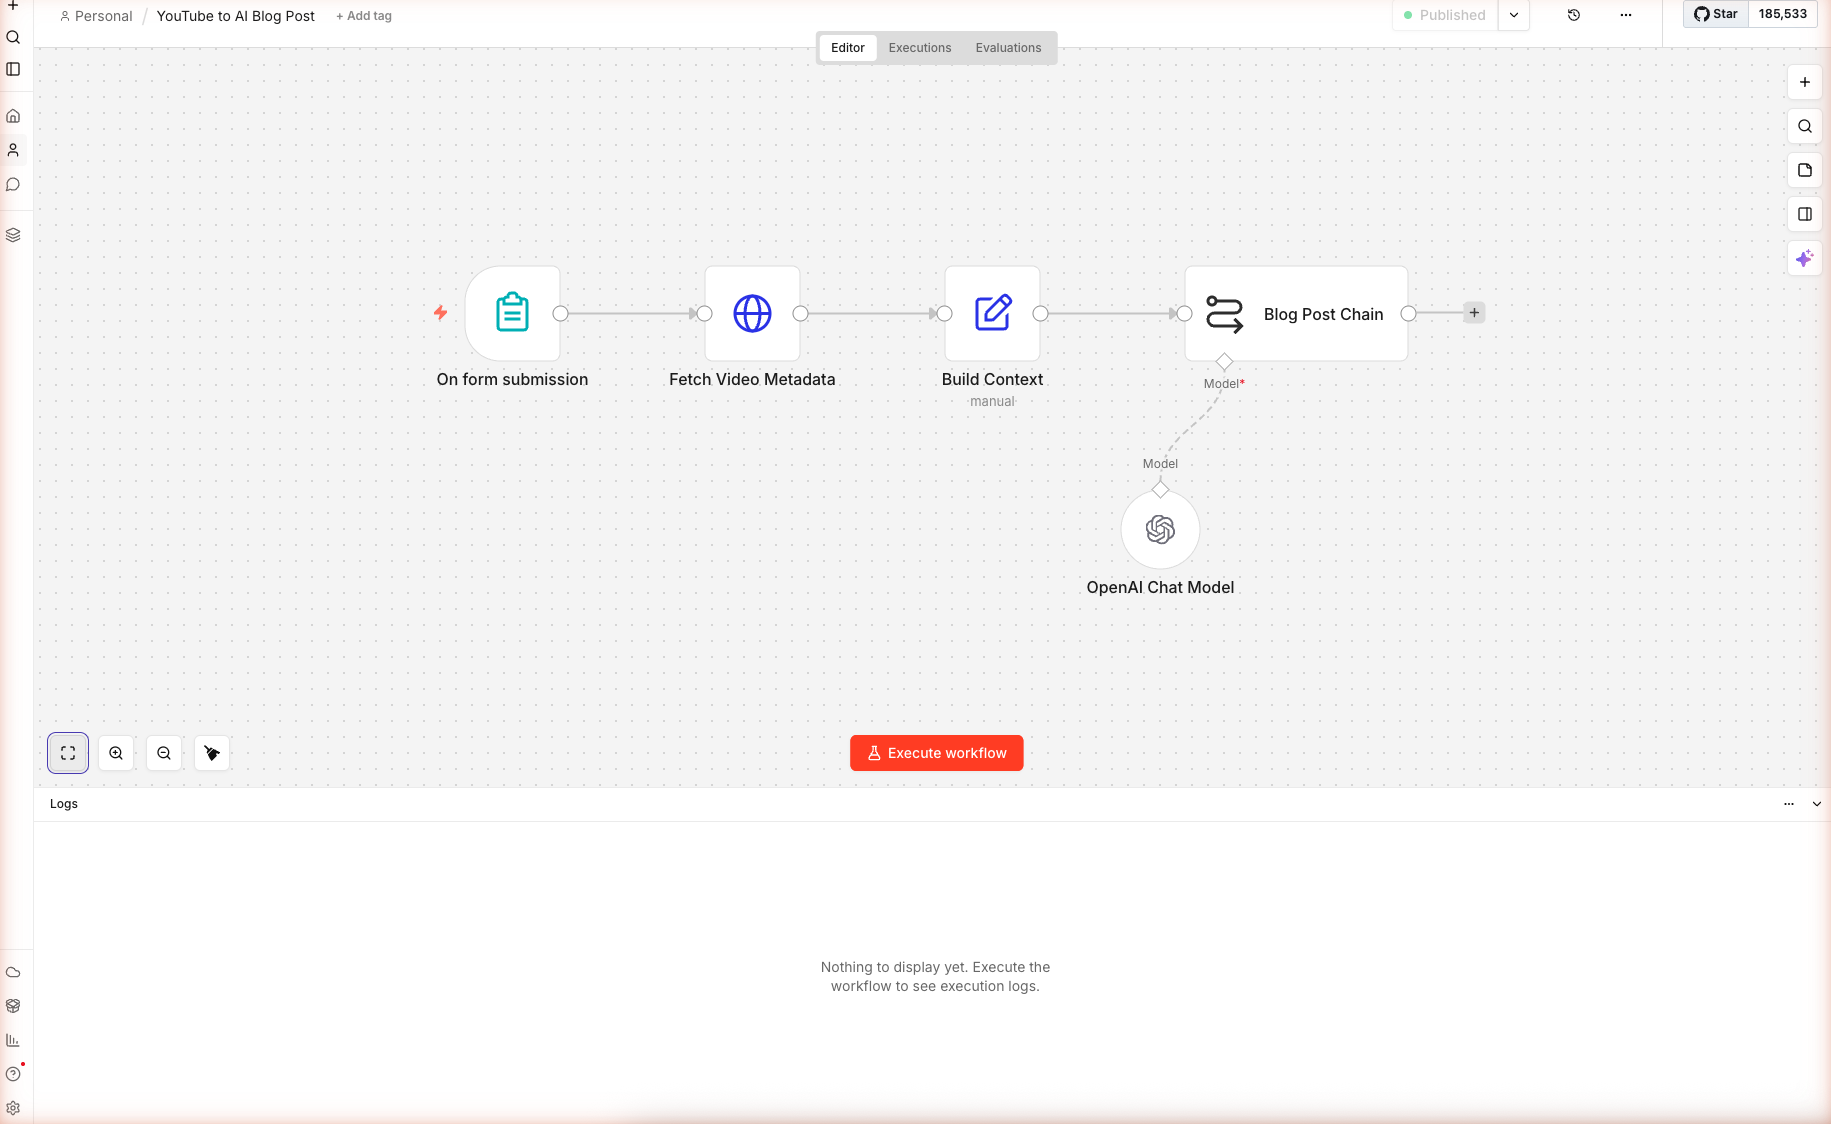
Skip the Manual Build — Import the Workflow
Don't want to wire nodes by hand? Download the complete workflow JSON and paste it into any empty n8n canvas. You'll only need to open the OpenAI Chat Model sub-node and select your credential.
To import: Create a new workflow → click anywhere on the blank canvas → press Cmd+V (Mac) or Ctrl+V (Windows). n8n detects the pasted workflow and loads all five nodes with their connections.
Prerequisites
| Requirement | Details |
|---|---|
| n8n account | Free 14-day trial on n8n.io/cloud — no credit card |
| OpenAI credits | 100 free credits built into n8n — no OpenAI key needed |
| A YouTube video with captions | Any video where you can open the "Show transcript" panel |
| Time | ~15 minutes |
n8n's AI Node Types Used Here
| Node | Purpose |
|---|---|
| Form Trigger | Public web form that starts the workflow |
| HTTP Request | Calls YouTube's oEmbed endpoint for metadata |
| Set | Builds a clean context object from multiple upstream items |
Basic LLM Chain (chainLlm) | Runs a single LLM call with a structured prompt |
| OpenAI Chat Model | Language model sub-node — attached to the chain |
Step 1 — Import the Workflow
1a. Create a New Workflow
From the n8n home dashboard click + Create workflow. A blank canvas opens with two placeholders: Add first step… and Build with AI.

1b. Paste the Workflow JSON
Download n8n-youtube-to-blog.json and copy its contents to your clipboard. Click once on the blank canvas to focus it, then paste with Cmd+V / Ctrl+V.
n8n recognizes the paste as a workflow import and immediately renders all five nodes with their connections. The workflow renames itself to "YouTube to AI Blog Post".
Why paste instead of "Import from file"? n8n's file picker is a native OS dialog — it's slower than pasting, and it strips webhook IDs that the Form Trigger depends on. Paste-import preserves the full node state, including webhook registrations.
Step 2 — Configure the Form Trigger
Double-click the On form submission node. The node panel has three areas you care about:
- Form URLs — the public test URL + production URL
- Form Title / Description — what users see when they open the form
- Form Elements — the fields users fill in
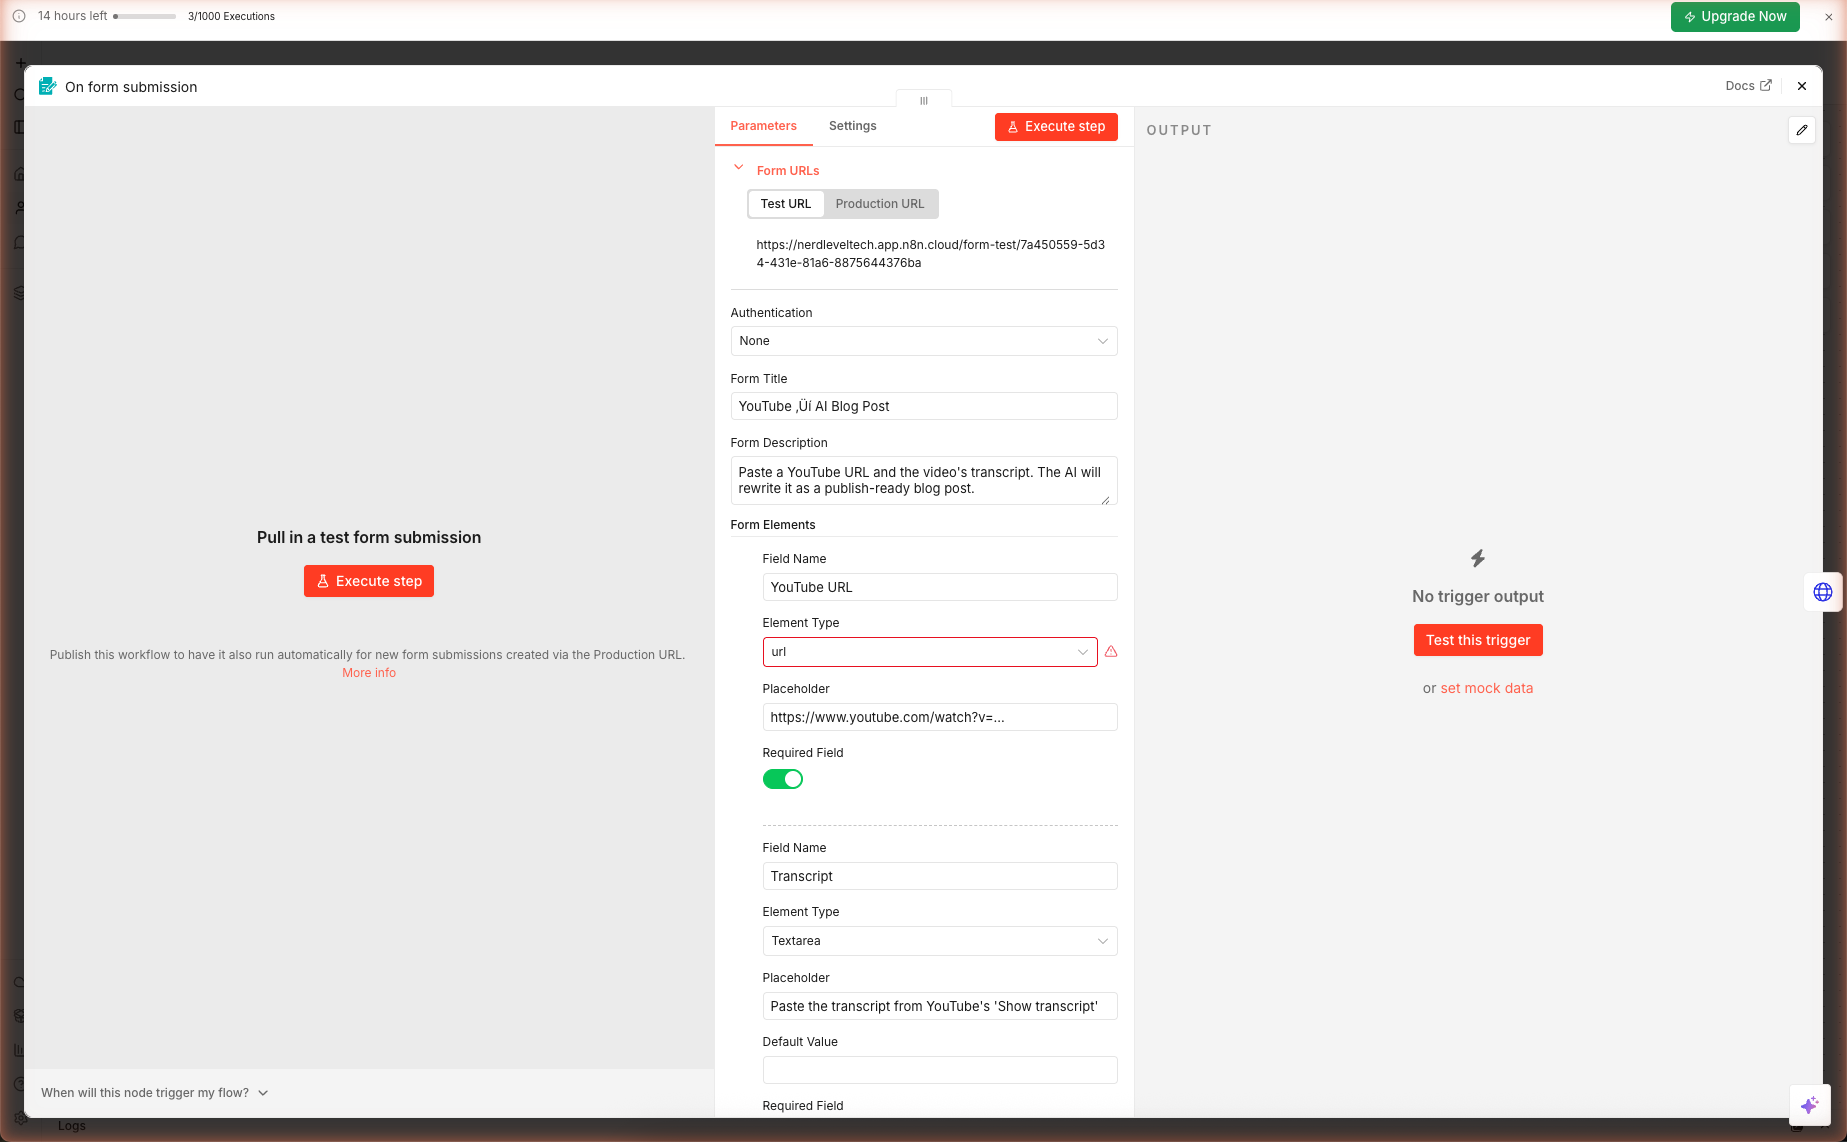
2a. Verify the Field Types
The imported workflow ships with three form fields. Confirm each one:
| Field | Element Type | Required |
|---|---|---|
| YouTube URL | Text Input | ✓ |
| Transcript | Textarea | ✓ |
| Blog Style | Dropdown (4 options) | ✓ |
Watch out: If you imported an older JSON that used
fieldType: "url", n8n will show a red indicator next to the Element Type dropdown becauseurlis no longer a valid form element type. Click the dropdown and pick Text Input instead.
2b. Grab the Test URL
The Test URL field shows a link like https://<your-workspace>.app.n8n.cloud/form-test/<uuid>. Copy it — you'll open it in Step 6 to run the workflow end-to-end. The Production URL only activates after you publish the workflow.
Step 3 — oEmbed Metadata Lookup
Why call oEmbed instead of scraping the YouTube page? Three reasons:
- No authentication. YouTube's oEmbed endpoint is public and requires no API key.
- Stable schema. The response has had the same shape (
title,author_name,thumbnail_url) since 2012. - Cheap. One small GET request per blog post — no rate limits for reasonable usage.
Double-click the Fetch Video Metadata node. Verify the URL expression:
https://www.youtube.com/oembed?url={{ encodeURIComponent($json['YouTube URL']) }}&format=json
The encodeURIComponent() call is load-bearing — without it, URLs with query strings (like ?v=aircAruvnKk&list=PL...) break the oEmbed call.
Why the "neverError" Option?
Under Options → Response → Never Error, the toggle is set to true. This means if the oEmbed call fails (private video, deleted video, region block), the workflow continues with an empty metadata object rather than erroring out. The Set node downstream handles the empty case with title || 'Untitled video'.
Step 4 — Build the Context Object
The Form Trigger returns one item with fields named "YouTube URL", "Transcript", "Blog Style". The oEmbed call returns title, author_name, etc. The Build Context node flattens these into a clean object the LLM Chain can reference without escaping quotes everywhere.
Double-click Build Context. You'll see five assignments:
| Output Field | Expression | Why |
|---|---|---|
title | {{ $json.title || 'Untitled video' }} | Fallback if oEmbed returned empty |
channel | {{ $json.author_name || 'Unknown channel' }} | Same — attribution in the opening line |
url | {{ $('On form submission').item.json['YouTube URL'] }} | Cross-reference form input |
transcript | {{ $('On form submission').item.json['Transcript'] }} | The raw text |
style | {{ $('On form submission').item.json['Blog Style'] }} | "Technical tutorial" / etc. |
The $('Node Name').item.json[...] syntax lets you reach back to any upstream node's output, even if it's not the immediate parent. This is how the Build Context node pulls from both the Form Trigger and the Fetch Video Metadata node.
Step 5 — The Blog Post Chain Prompt
This is where the magic happens. Double-click Blog Post Chain. The Text field contains the full prompt — about 350 words of structured instructions. Here is the spine of it (paraphrased for brevity):
You are a senior tech editor. Convert the raw YouTube video transcript
below into a publish-ready blog post in the style: {{ $json.style }}.

VIDEO METADATA
  - Title: {{ $json.title }}
  - Channel: {{ $json.channel }}
  - URL: {{ $json.url }}

TRANSCRIPT
  """
  {{ $json.transcript }}
  """

OUTPUT REQUIREMENTS (strict)
  1. Return pure Markdown only.
  2. First line: # <SEO-friendly H1 under 60 chars>
  3. Second block: > <One-sentence TL;DR under 160 chars>
  4. Third block: 2-sentence intro that hooks the reader.
  5. Body: 3-5 ## H2 sections with meaningful subheadings.
  6. Include an inline linked credit to the video.
  7. End with a 3-item Takeaways list.
Why These Specific Rules?
- "Pure Markdown only — no preamble" defeats gpt-5-mini's tendency to prepend "Sure! Here is the blog post:". You want the output usable without post-processing.
- "TL;DR under 160 chars" is sized for Google's meta description field and for AI Overview citation snippets.
- "3–5 H2 sections" bounds the post length. Without this, gpt-5-mini often returns a 400-word summary instead of a structured article.
- "No emojis unless Casual explainer" matches tone to style. Emojis in a Technical tutorial signal low effort.
Connecting the Model
The Blog Post Chain has a required Model connector at the bottom (marked with a red asterisk). The imported workflow already connects this to the OpenAI Chat Model sub-node — you just need to verify the credential.
Double-click the OpenAI Chat Model sub-node. It should look like this:
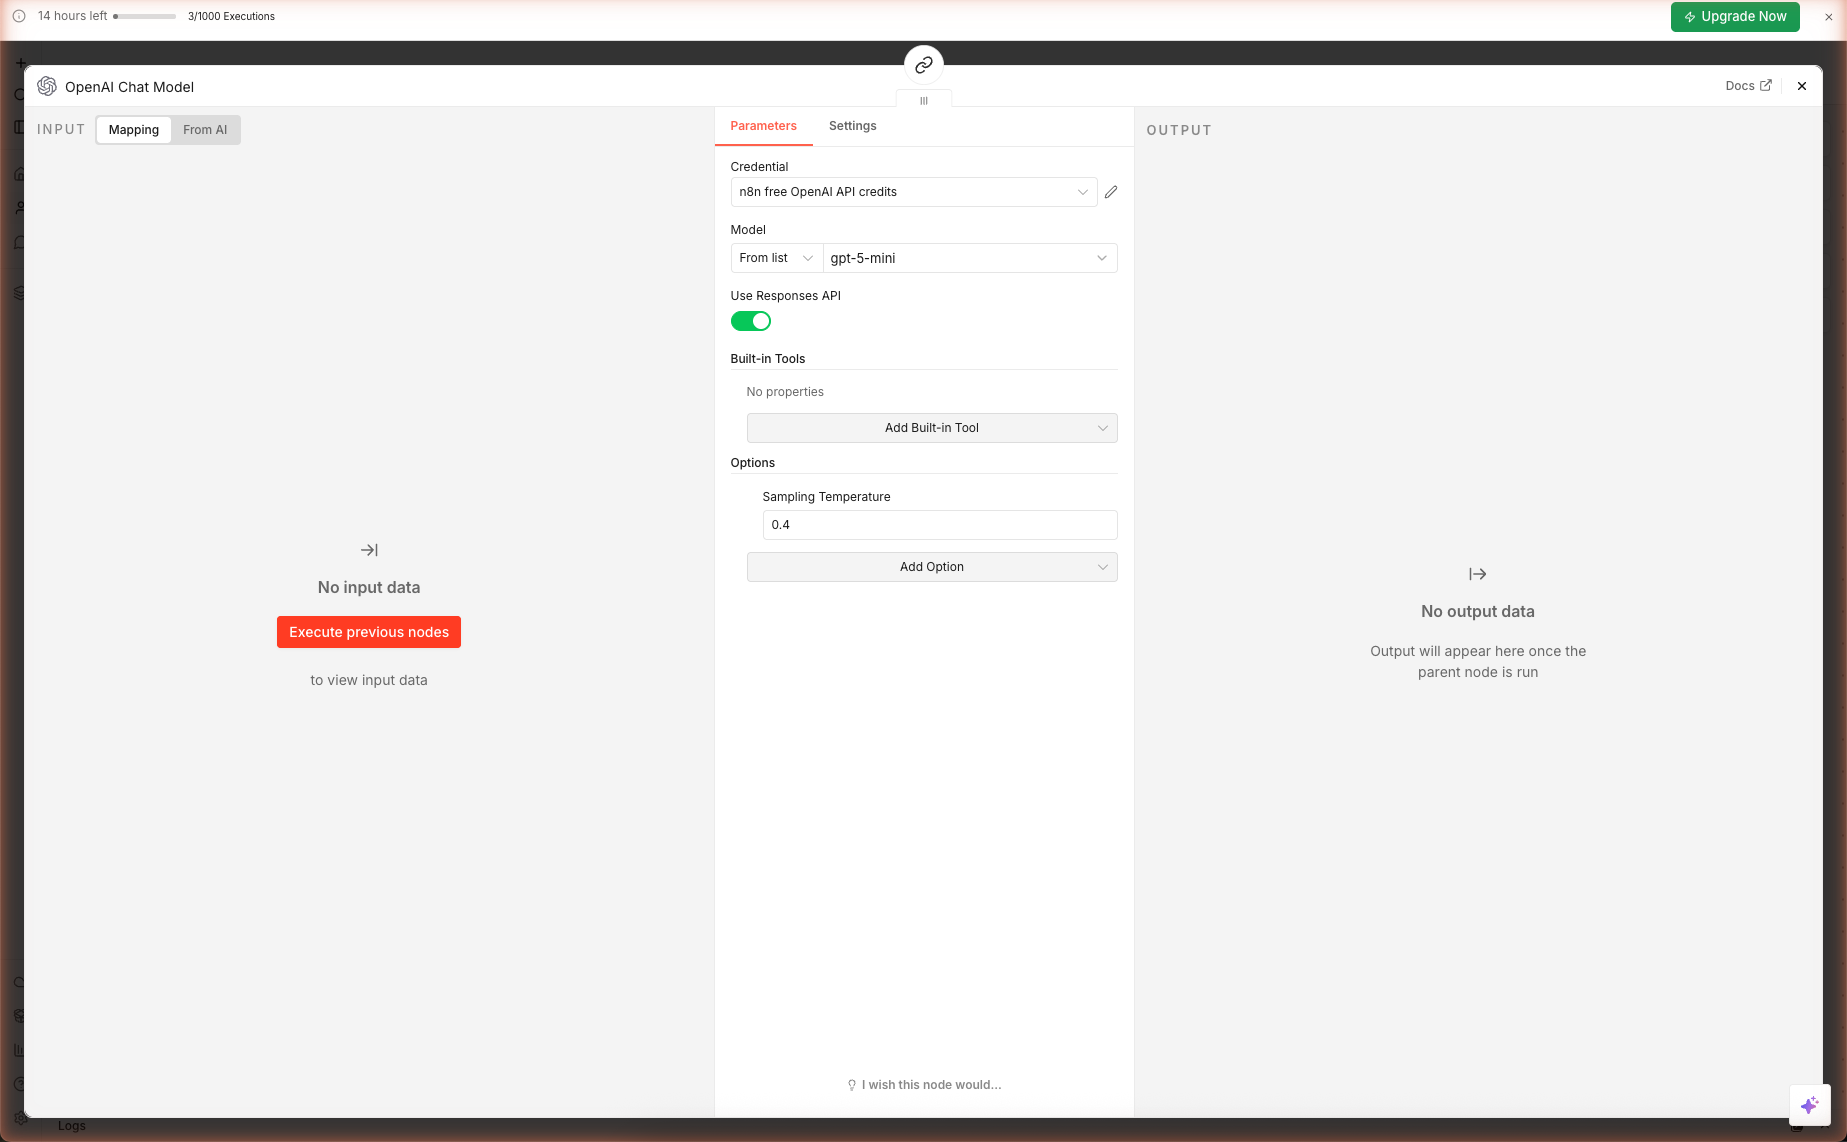
| Field | Value | Why |
|---|---|---|
| Credential | n8n free OpenAI API credits | Auto-created when you claimed the 100 free credits |
| Model | gpt-5-mini | Best speed/quality ratio for content generation |
| Use Responses API | true | Enables the newer OpenAI endpoint — faster + cheaper |
| Sampling Temperature | 0.4 | Low enough for structural consistency, high enough for lively prose |
Step 6 — Run the Full Pipeline
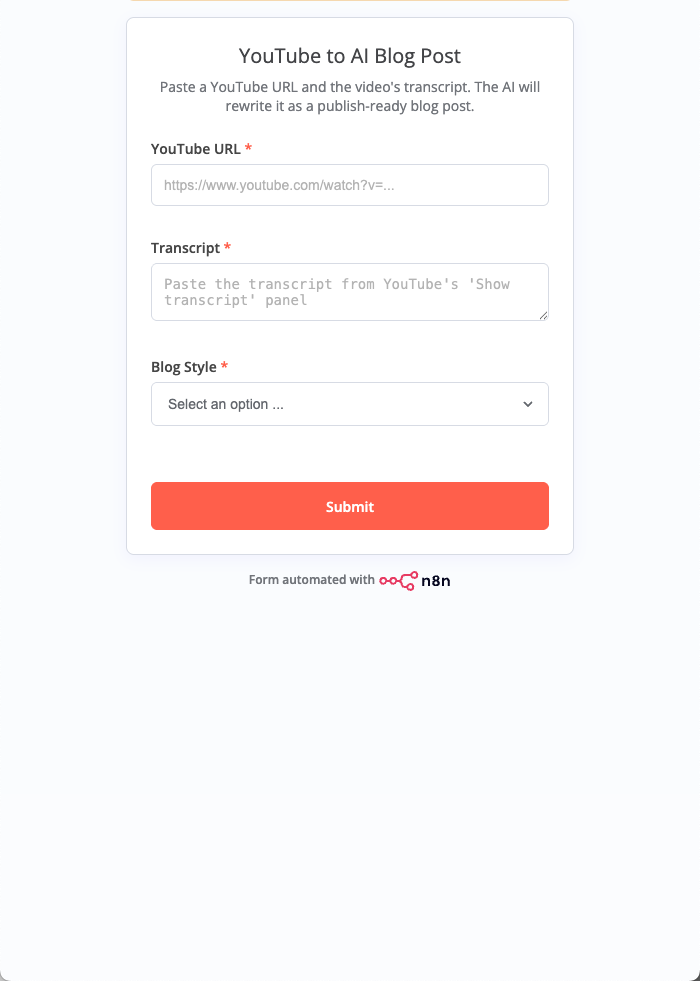
6a. Open the Test Form
Open the Test URL you copied in Step 2 (or click Test this trigger from the Form Trigger node panel). The public form loads:
6b. Grab a Real Transcript
Open any YouTube video that has captions enabled. Under the video description, click the "..." menu → Show transcript. A right-side panel opens with time-stamped lines. Click the three-dot menu inside that panel → Toggle timestamps to get plain prose, then select-all and copy.
6c. Submit the Form
Paste the YouTube URL into the first field, paste the transcript into the textarea, pick a style from the dropdown, and click Submit.
The form shows "Form Submitted — Your response has been recorded." Behind the scenes, n8n runs the five-node chain in sequence. With gpt-5-mini, end-to-end execution takes 15–40 seconds depending on transcript length.
6d. Inspect the Output
Back in the n8n editor, click the Executions tab on the top toolbar. You'll see the run you just triggered. Click it to open the execution view, then click the Blog Post Chain node to see the text output — the full Markdown blog post.
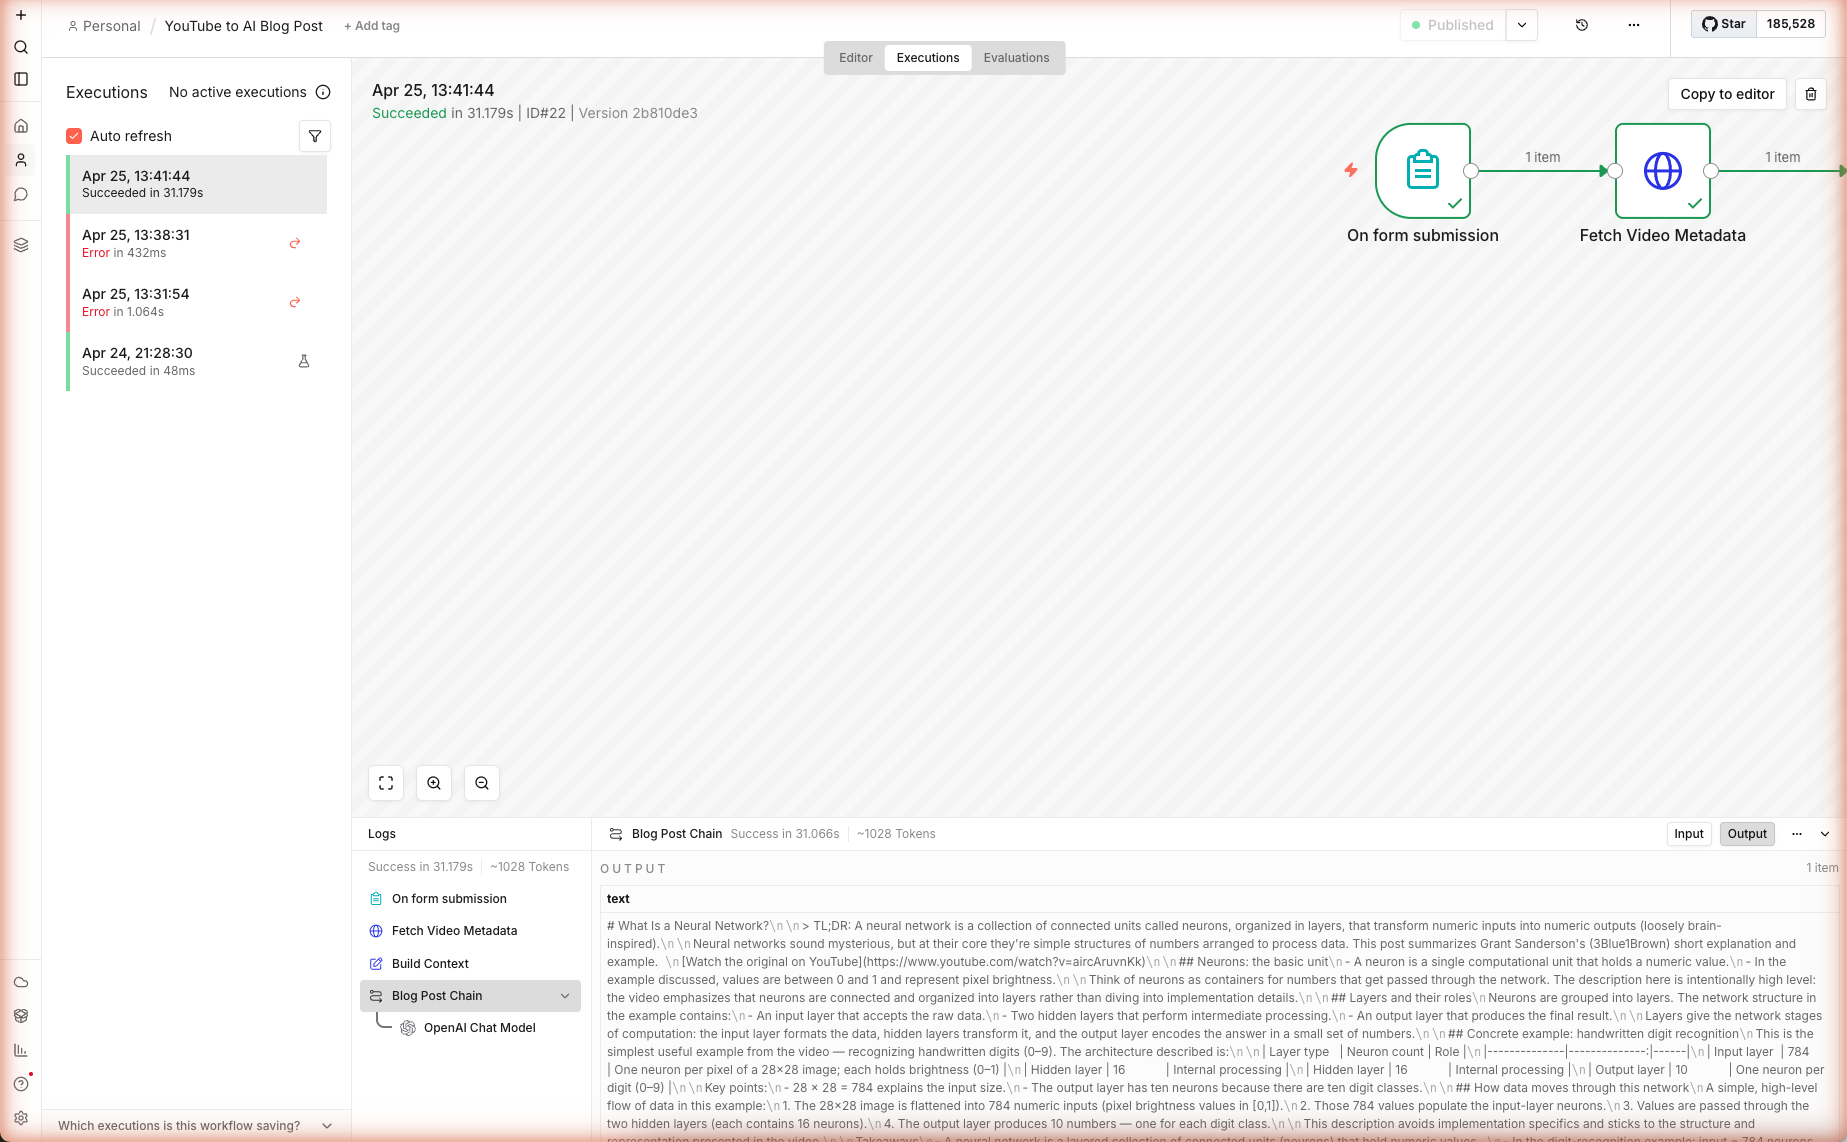
In our live test run, a transcript from a 3Blue1Brown neural-network primer produced a 900-word technical tutorial with four H2 sections, an architecture table, and a takeaways list — all in 31.2 seconds, ~1,028 tokens through gpt-5-mini.
Extensions & Production Notes
Auto-Fetch the Transcript (Remove the Manual Paste)
Replace the Form Trigger's Transcript field with an automated fetch. After the Form Trigger, insert two nodes:
- HTTP Request — GET
https://youtubetotranscript.com/transcript?v={{ videoId }}(or any transcript API you trust) - Code — parse the response to plain text
Then wire the Code node's output into Build Context in place of the form field. Expect occasional empty returns for private/age-gated/regional content — keep the Form Trigger's Transcript field as a fallback input.
Push Straight to WordPress
Add a WordPress node after the Blog Post Chain. Connect your WordPress credentials (needs an application password, not your main login). Map:
- Title →
{{ $json.text.match(/^# (.+)/)[1] }} - Content →
{{ $json.text }} - Status →
draft - Categories / Tags → your defaults
Schedule for RSS-Driven Content
Swap the Form Trigger for an RSS Feed Read Trigger pointed at your favorite YouTube channel's feed (https://www.youtube.com/feeds/videos.xml?channel_id=<ID>). Each new video auto-runs through the pipeline and drops a draft into your CMS. Combine with a webhook back to Slack for a "new draft ready" notification.
Guardrails Before You Publish
Never publish LLM output without a human pass:
| Check | How |
|---|---|
| Factual hallucinations | Read the article against the transcript. Flag any claim not in the source. |
| Attribution | Verify the channel name and video title match reality. oEmbed sometimes returns stale cached titles. |
| Link rot | Confirm the YouTube URL resolves — private videos 404. |
| Brand voice | If the blog style chosen doesn't match your brand, re-run with a different style. |
Token Cost Per Post
| Model | Input cost / 1M | Output cost / 1M | Cost per ~900-word post |
|---|---|---|---|
gpt-5-mini | $0.25 | $2.00 | ~$0.003 |
gpt-5 | $1.25 | $10.00 | ~$0.015 |
gpt-4.1-mini | $0.40 | $1.60 | ~$0.004 |
⚠ Prices change frequently. The values above are for illustration only and may be out of date. Always verify current pricing directly with the provider before making cost decisions: Anthropic · OpenAI · Google Gemini · Google Vertex AI · AWS Bedrock · Azure OpenAI · Mistral · Cohere · Together AI · DeepSeek · Groq · Fireworks AI · Perplexity · xAI · Cursor · GitHub Copilot · Windsurf.
Numbers are approximate and vary by transcript length. n8n logs exact tokenUsage in each execution — check the node output to see what a real run cost.
What's Next
You now have a repeatable pipeline for turning any spoken content into publish-ready articles. The same pattern works for:
- Podcast episodes (paste the transcript from Descript / Otter)
- Conference talks (YouTube has them all)
- Internal Zoom recordings (export the caption
.vtt, paste the transcript)
Read the companion guide → Multi-Source AI News Digest to schedule the same LLM chain against daily tech feeds, or jump to AI Twitter Thread Writer to turn the blog post output into a viral X thread.